The Swiss Bay blog
Intel ME removal on a 2011 MacBook Pro
Posted on 10.02.22@1330 CEST
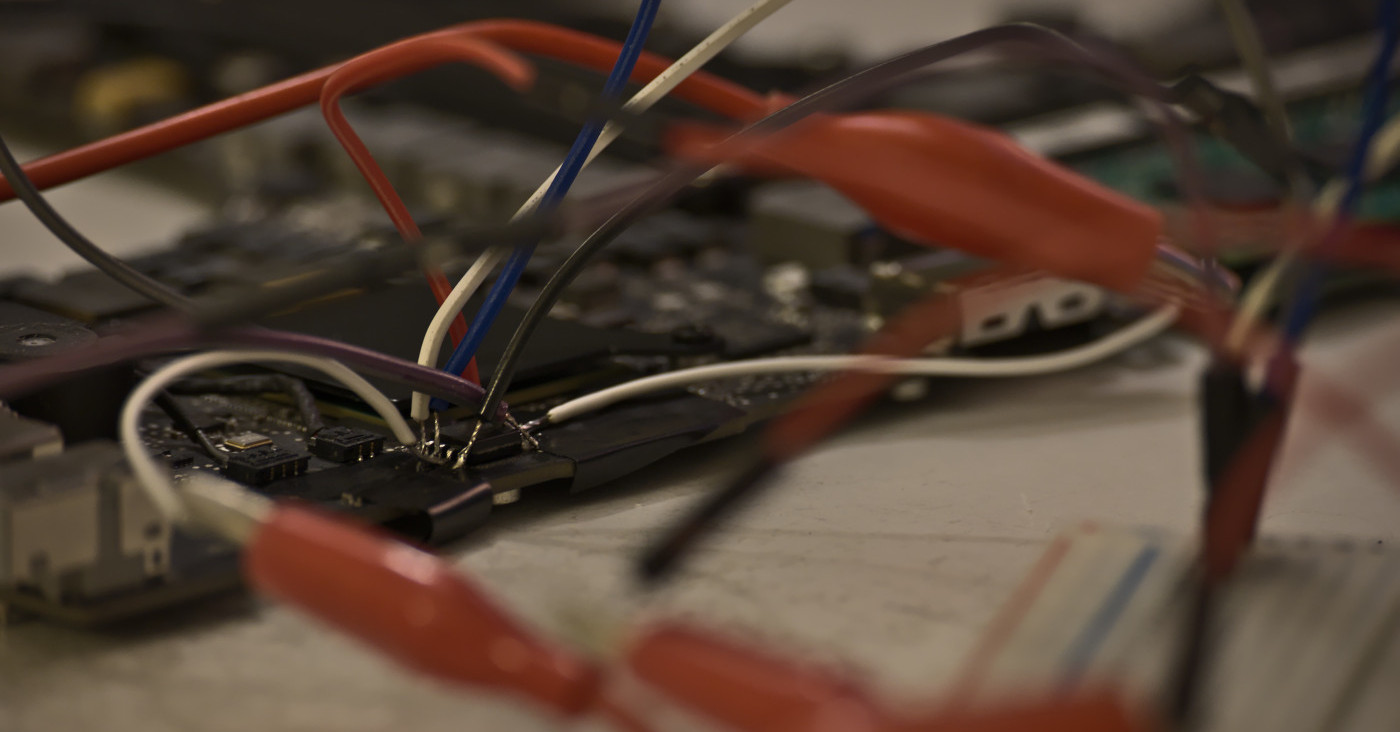
Table of contents
- Introduction
- Current state of ME
- Finding the ROM chip
- Preparation for flashing
- Reading the firmware
- Cleaning the firmware
- Writing the firmware back
- Verifying the job
- Conclusion
Introduction
The Intel Management Engine (WikiChip, Wikipedia) is a highly-privileged co-processor present on all Intel chipsets since 2006. As it is implemented in hardware, it cannot be removed. Moreover, it can’t be simply discarded in software because a hard-coded 30 minutes timer signals to the processor that it must reset, which in turn makes it impossible to use a computer as we please. Given it has access to all system resources (provided there is power) it presents a huge security risk if exploited. Indeed, clear portions of RAM could be snooped on, rendering any encryption useless. That’s just one nightmare scenario.
As with most modern computers, a firmware must be loaded to initialize the subcomponents and bring the system to a usable state. This blob is usually located in the vendor firmware which can be an old-style BIOS or more recent UEFI. Regardless of its type, a clever tool called me-cleaner allows us to alter the ME portion contained within so that it doesn’t have the chance to become operational, effectively neutralizing it. It should be noted that unknown side effects may arise after this operation, such as fans behaving abnormally, but this is more prevalent with OEM appliances such as branded servers and computers.
This write-up covers the entire process of neutralizing the ME on a Mid-2011 MacBook Pro, but the only Mac-specific parts are extracting the motherboard (or “logic board” in Apple terminology) and locating the on-board ROM chip. You should be able to adapt this to your case without too many changes.
Mac users, if you're looking for firmware try this repo.
Current state of ME
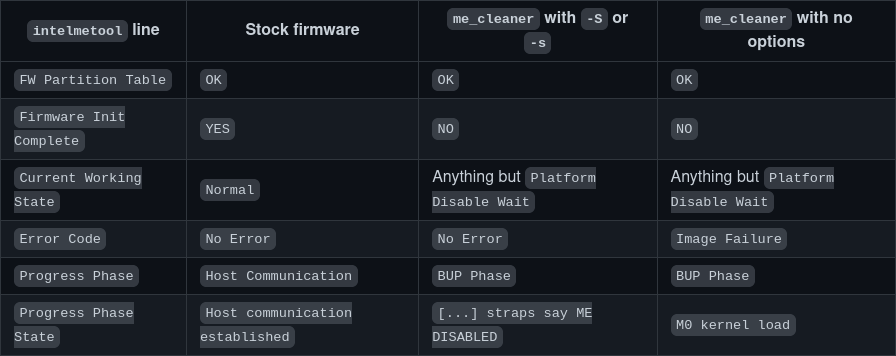
Using a tool called intelmetool (part of coreboot), we can check the current state of the ME. Note this might require you to boot with iomem=relaxed as an extra option for your kernel.
$ sudo ./intelmetool -dm
Bad news, you have a `HM65 Express Chipset LPC Controller` so you have ME hardware on board and you can't control or disable it, continuing...

MEI found: [8086:1c3a] 6 Series/C200 Series Chipset Family MEI Controller #1

ME Status   : 0x1e000255
ME Status 2 : 0x66000006

ME: FW Partition Table      : OK
ME: Bringup Loader Failure  : NO
ME: Firmware Init Complete  : YES
ME: Manufacturing Mode      : YES
ME: Boot Options Present    : NO
ME: Update In Progress      : NO
ME: Current Working State   : Normal
ME: Current Operation State : M0 with UMA
ME: Current Operation Mode  : Normal
ME: Error Code              : No Error
ME: Progress Phase          : Host Communication
ME: Power Management Event  : Pseudo-global reset
ME: Progress Phase State    : Host communication established

PCI READ [bc] : 0x000000bc
ME: Extend SHA-256: 0a4913fa652f26926f91c7269def4f8b4c457fc1170ada0732b1717a3f810287

WRITE    [00] : CB: 0x80040007
WRITE    [00] : CB: 0x000002ff
expected u32 = 8
ME: timeout waiting for data: expected 8, available 0
ME: GET FW VERSION message failed
The important bits here are Firmware Init Complete, Current Working State, and Progress Phase as per this doc page. You might want to make a copy of your output to compare with the clean state afterwards.
Finding the ROM chip
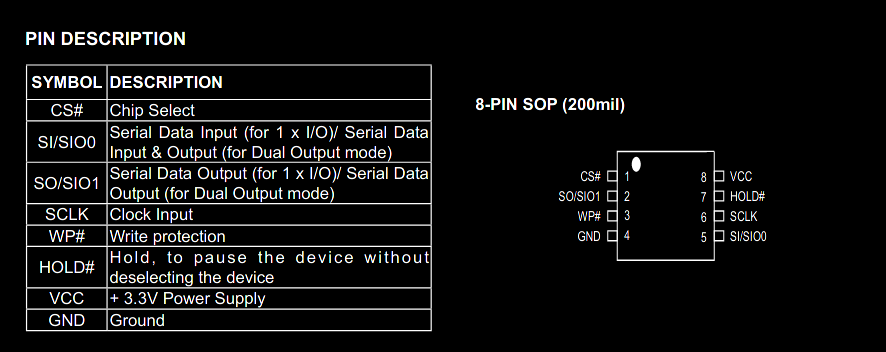
In most cases, this will be a small 8-pin EEPROM such as this:
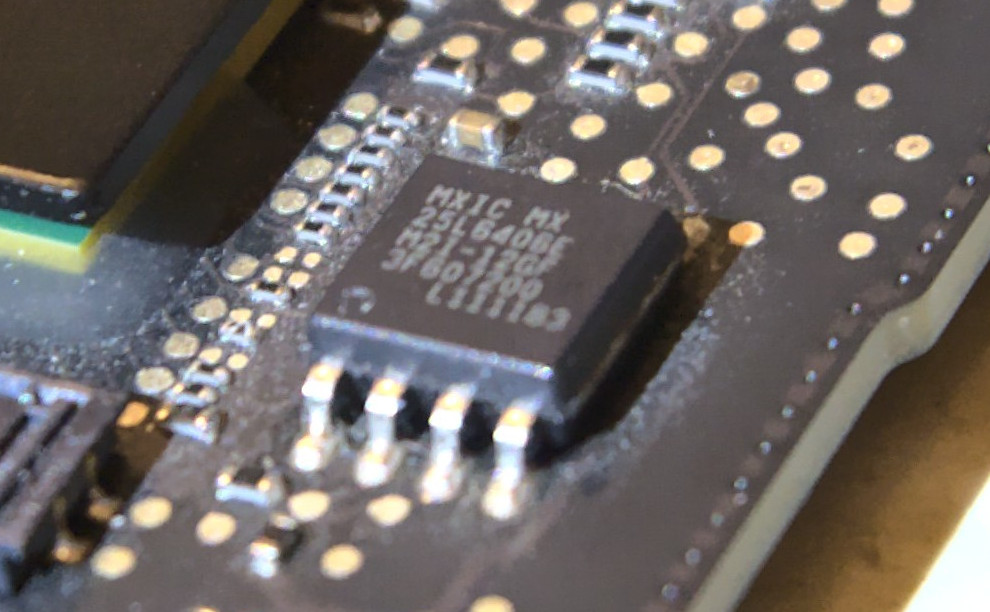
The datasheet confirms what we want to see (flash memory, 3.3V, SPI interface).

Laptops make your life harder by having those on the backside of the motherboard, while desktops have (most if not) all components on the front side and the chip can even be removed from its socket for use on a breadboard. When in doubt, the Internet is your best friend. Start looking for similar chips and check their datasheet to see which of those are ROMs.
Preparation for flashing
To be able to extract the current firmware for further analysis, we have to interface with the chip. This is usually done with SPI and the Raspberry Pi provides just that. I don’t have a convenient SOIC8 clip so I had to solder wires.
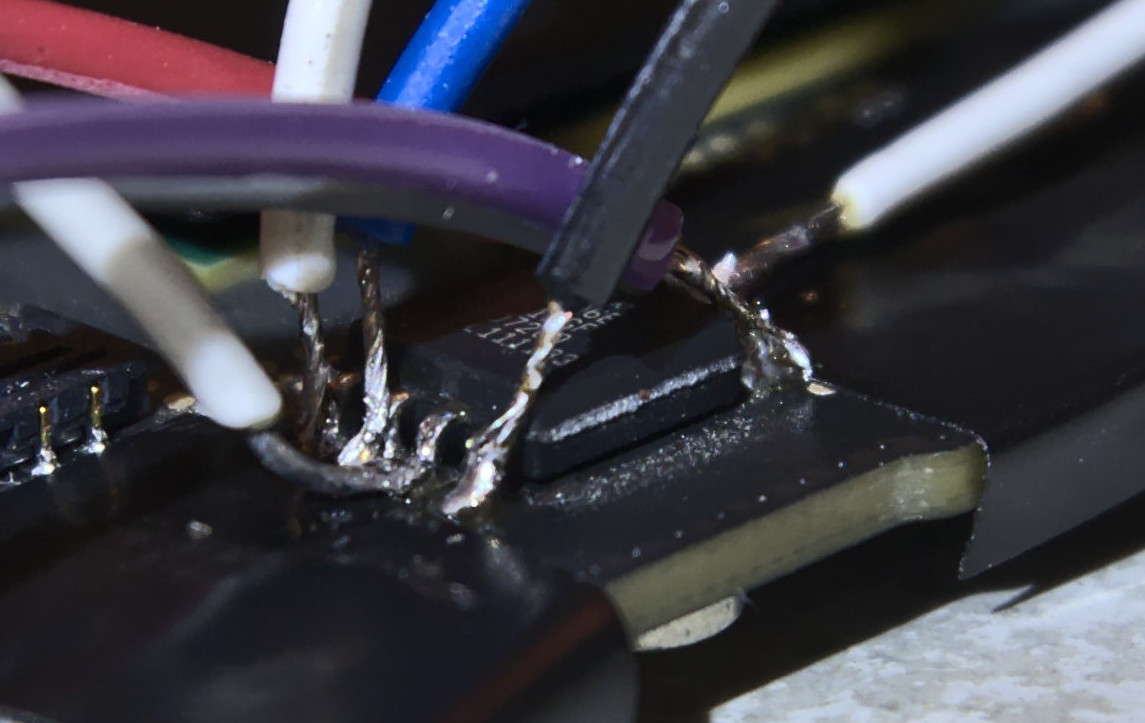
Notice the presence of electrical tape to prevent solder spills from altering joints we’re not interested in.
The next step is to set up the appropriate pins on the RPi, so we check pinout.xyz to avoid making mistakes (or fry something up).
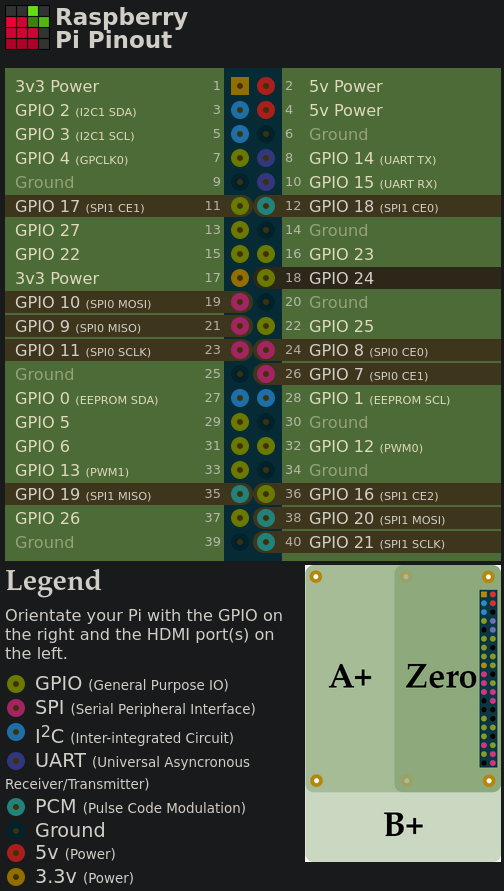
The corresponding pins to use on the chip are as follows:
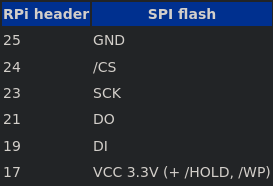
To properly map them, we refer to the datasheet once again. Note that /HOLD and /WP have to be held high (at VCC), as the / or # denote a logical NOT and the double negation disables both of those functions we don’t want.
You might want to make the I/O connections as short as possible. In some cases, you might not get enough current for the digital mode to pass through. Also, make sure you don’t overvolt the chip by carefully reading the datasheet and using the appropriate pins on whichever SPI programmer you use.
Reading the firmware
At this point, we can use flashrom to extract the ROM chip’s data. To speed up the detection process, I specified why chip it should use. This can be adapted to your case by looking for the right device in this table. If it fails, try swapping the I/O cables which might be mismatched.
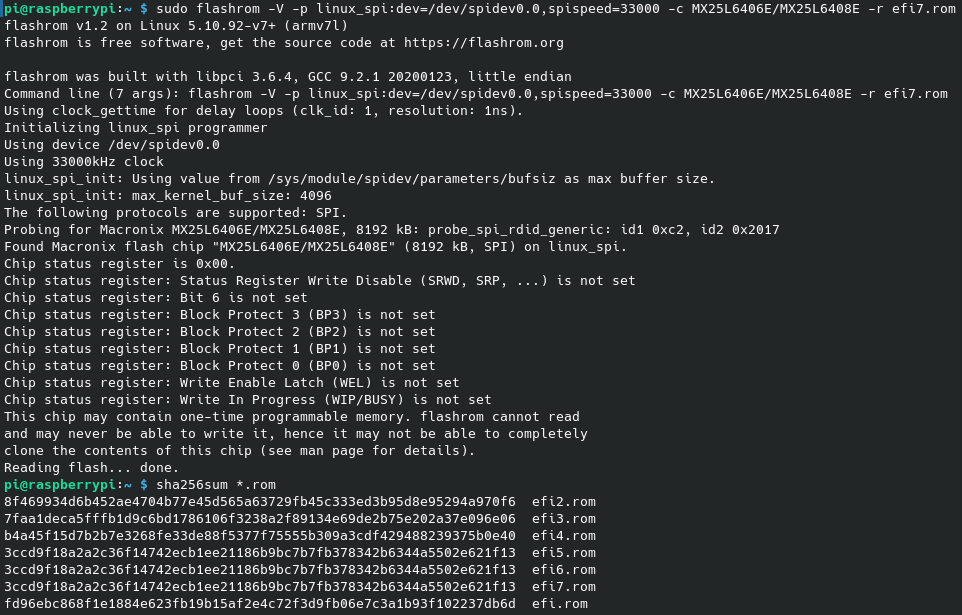
Always read the firmware 3 times and check that they all have the same digest value. It might be the case that multiple reads don’t yield the same file, which has the potential to be problematic if you plan to rollback any changes later on (assuming the system doesn’t complain about the ROM having been changed). Just make sure you don’t write to the same file every time, i.e. change the output numbering.
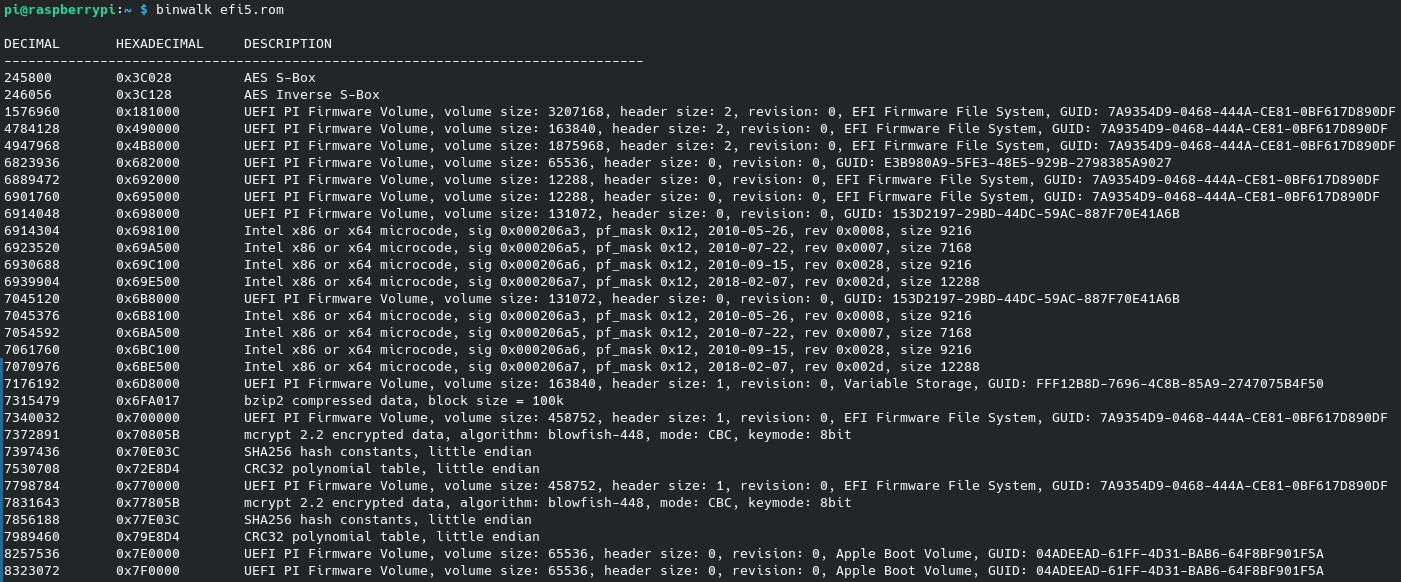
Using binwalk, we can see the contents we are expecting:
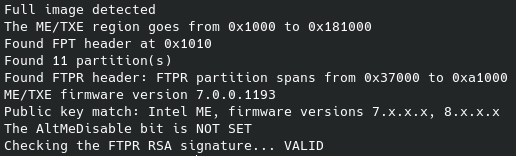
More details on the ME firmware can be found using me-cleaner:
Cleaning the firmware
We can now use me-cleaner to work on the extracted firmware to neutralize ME.
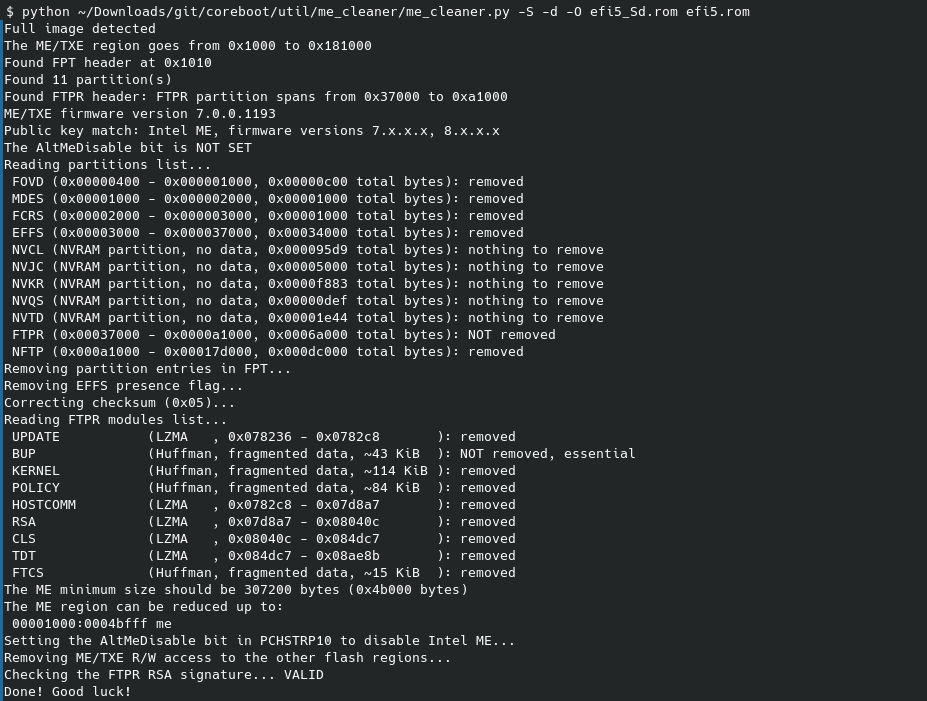
The -d flag is optional and can be omitted, but I believe it’s nice to restrict which portions of the flash descriptor are accessible by the ME. If it doesn’t work in either way, try this -s instead of -S which kindly asks ME to disable itself instead of messing up the its firmware.
Writing the firmware back
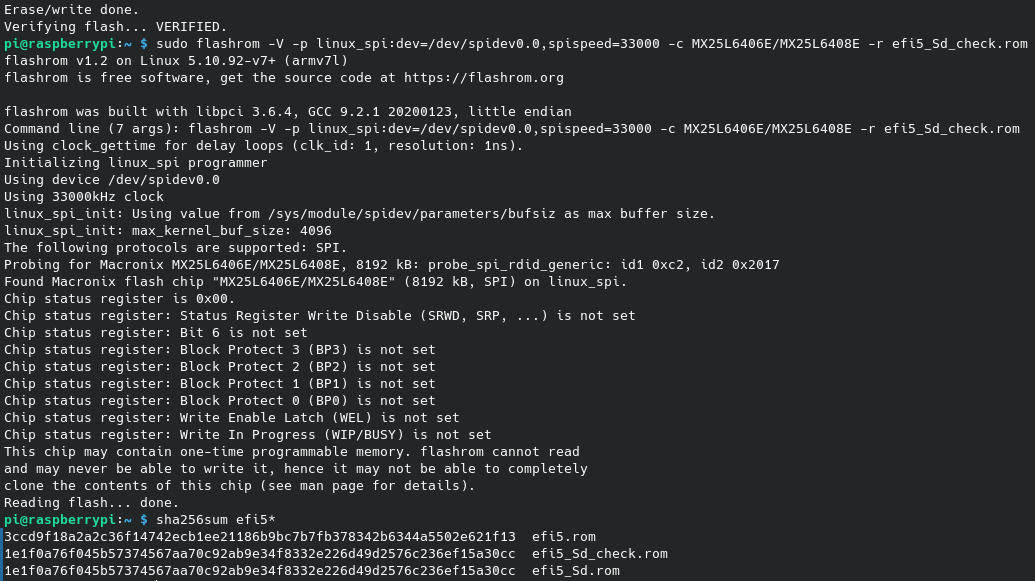
Like before, we use flashrom but with different options to write to the chip, and we also read it back one more time to see if digests are all correct.
Verifying the job
After carefully mounting everythink back, we can boot and check the new state of ME using intelmetool (new values with arrows).
$ sudo ./intelmetool -m
Bad news, you have a `HM65 Express Chipset LPC Controller` so you have ME hardware on board and you can't control or disable it, continuing...

MEI found: [8086:1c3a] 6 Series/C200 Series Chipset Family MEI Controller #1

ME Status   : 0x20191 <------
ME Status 2 : 0x100a0000 <------

ME: FW Partition Table      : OK
ME: Bringup Loader Failure  : NO
ME: Firmware Init Complete  : NO <------
ME: Manufacturing Mode      : YES
ME: Boot Options Present    : NO
ME: Update In Progress      : NO
ME: Current Working State   : Initializing <------
ME: Current Operation State : Bring up <------
ME: Current Operation Mode  : Debug <------
ME: Error Code              : No Error
ME: Progress Phase          : BUP Phase <------
ME: Power Management Event  : Clean Moff->Mx wake <------
ME: Progress Phase State    : Check to see if straps say ME DISABLED <------

ME: Extend SHA-256: 0a4913fa652f26926f91c7269def4f8b4c457fc1170ada0732b1717a3f810287

ME: failed to become ready
ME: failed to become ready
ME: GET FW VERSION message failed
This time around, Firmware Init Complete is NO and all other flags except Error Code show a non-operational state which you can check on this doc page.
Conclusion
At this point, we have successfully rendered the Intel ME useless on this system, provided the firmware doesn’t get updated with a clean ME region (typical after a macOS update). That’s a bit less attack surface, but other problems (probably) still exist with some being unknown/secret for now.
Security is a complicated topic because you need a proper threat model for which you’ll then deploy some security policy with chosen counter-measures, prevention techniques, and contigency plans, otherwise you don’t know what you’re doing and might get a misleading sense of security. It is however trivial to say that removing/disabling unused software greatly reduces one’s exposure to threats, regardless of the threat model you (may) have.